History
Traditional bicycle pedals have flat platforms and are designed to be used with any type of shoe. These are the kind of pedals that you used when you were growing up. Further innovation led to pedals with toe clips, which are essentially cages that keep your foot in place.
It wasn’t until 1984 when a French company applied snow ski technology to pedals that the modern day clipless pedal system was born. In this system, your feet are locked into place and won’t come off unless you want them to by swinging your heels in a lateral movement to disengage. Bernard Hinault’s victory at the Tour de France in 1985 led to widespread acceptance of the clipless system by cyclists and triathletes around the world.
Clipless pedals have several advantages over traditional, flat pedals.
-
Maximum power transfer
-
Increased pedaling efficiency
-
Reduce slippage in wet conditions
-
Increased stability on uneven terrain
How do they work?
There are three components to the clipless pedal system.
-
Cleats
-
Pedals
-
Cycling Shoes
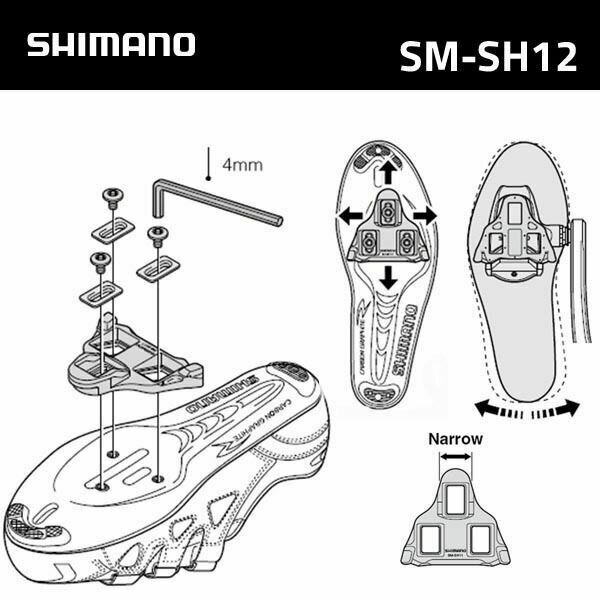
The cleats are small, separate devices that attach to the soles of the cycling shoes and engage with compatible pedals on the bicycle. They should be positioned to hold the balls of the feet over the pedals and to match your natural foot inclination. Most systems allow some lateral movement called “float,” which helps prevent knee injury caused by misalignment of your foot with your natural leg movement.
To attach the cleat to the shoe, you line up the bolts and tighten with an Allen wrench.
See the diagram below from Shimano.

Pedals
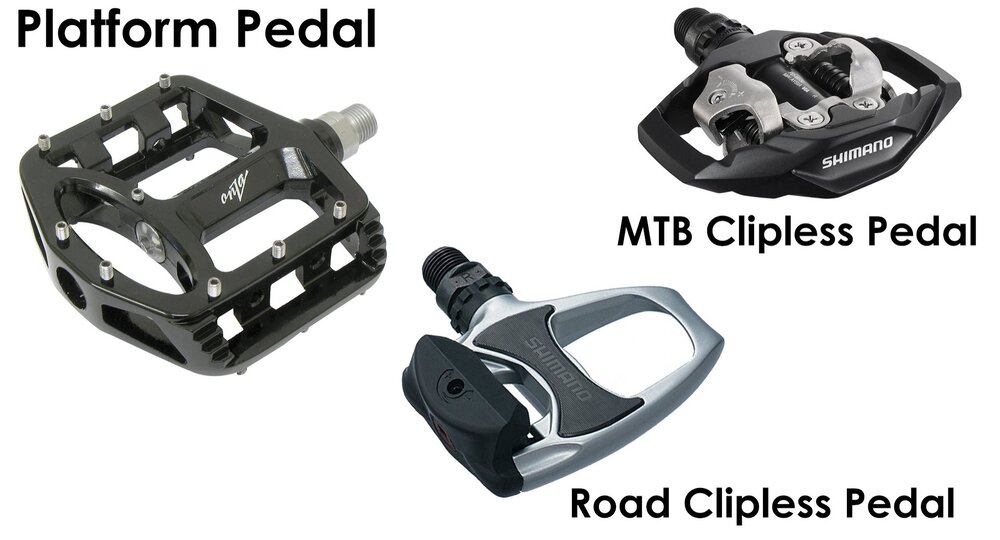
The platform pedal is designed to work with any type of shoe, but they work better with grippy soles or treads, and are easy to get off of in the event of a crash. These work best for commuters and recreational riders.
The MTB or Mountain Biking pedal works with MTB cycling shoes that allow the rider to disengage from both sides of the pedal. These pedals are smaller than road pedals.
The Road pedal works with road or triathlon cycling shoes and they can only be clipped-in from one side. These pedals have a greater surface area than MTB pedals.

image credit: dedhambike
Clipless Shoes
-
MTB (walkable)
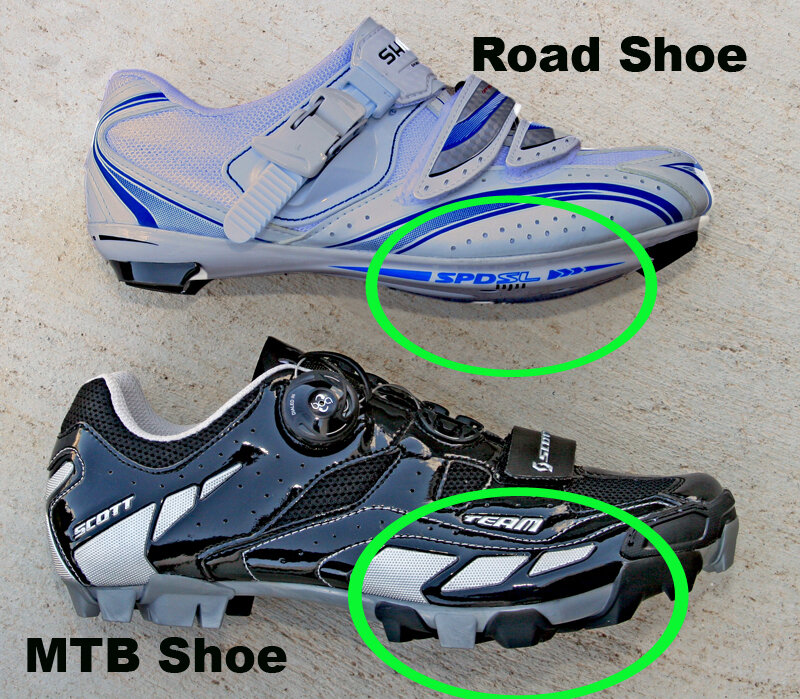
The cleats are recessed into the soles of the cycling shoe. You can clip into either side of the pedal and it’s easier to walk around in them because the cleats do not contact the ground. However, they are bigger and weigh more than road shoes. These are typically used on mountain bikes or for off-road riding.
-
Road
Alternatively, the cleats protrude from the bottom of the soles of the cycling shoe. These are single sided so you can only clip in from one direction. They are difficult to walk in, but feature several advantages over MTB shoes such as, lighter weight, increased aerodynamics and better performance.
*Ironically they are called “clipless” pedals because they were proceeded by toe cages, called “clips.” However, they actually “clip-in” to the pedals, similar to a ski binding.

image credit: TriSports
How to Use Them
Clipless pedal systems are intimidating at first, but the performance benefits are substantial and it becomes second nature once you become comfortable with engaging and disengaging your feet from the pedals.
To practice, stand over your bike with one foot planted on the ground. Take the other foot and practice getting your foot in and out of the pedal. You should hear a clicking noise when the shoe is engaged onto the pedal.
Click your right foot into the right pedal and remove it 20 times, then repeat the same process with your left foot. Practice on a soft surface like a lawn if you’re worried about falling over. It should begin to feel easy and natural.
Once you’re comfortable, do a short lap around the block and practice slowing down and getting out of the pedals. Always remove one foot at a time. If you’re at a stop, you only need to disengage one foot to plant it on the ground, while leaving the other foot locked into the pedal. The most common mistake that people make is trying to get your feet out of the pedals by pulling back (the toe clip-in motion) instead of swiveling your heels to the side.
Check out these videos from Global Cycling Network for helpful instructions: